内容が古くなっている可能性がありますのでご注意下さい。
WordPressの投稿や固定ページにOpenStreetMapの地図を貼り付けるためのプラグイン、Embed OSMのバージョン0.4では、オプションの設定画面を追加します。
バージョン0.4のembed-osm.phpの完全なリストは以下のとおりです。
<?php
/*
  Plugin Name: Embed OSM
  Plugin URI: http://midoriit.com/works/embed-osm.html
  Description: Embed OpenStreetMap on the page.
  Version: 0.4
  Author: Midori IT Office
  Author URI: http://midoriit.com/
  License: GPL3
*/

$embedosm = new EmbedOSM();

class EmbedOSM {

  public function __construct() {
      register_activation_hook(__FILE__, array(&$this,'embed_osm_activate'));
      register_uninstall_hook(__FILE__, 'EmbedOSM::embed_osm_uninstall');
      add_shortcode('embed_osm', array(&$this, 'embed_osm_handler'));
      add_action('admin_menu', array(&$this, 'embed_osm_menu'));
  }

  public function embed_osm_activate() {
    add_option('embed_osm_width', '400');
    add_option('embed_osm_height', '300');
  }

  public static function embed_osm_uninstall() {
    delete_option('embed_osm_width');
    delete_option('embed_osm_height');
  }

  public function embed_osm_handler( $atts ) {
    $width = get_option('embed_osm_width');
    $height = get_option('embed_osm_height');
    $uniq = uniqid("",1);

    extract( shortcode_atts( array(
      'lon' => '0',
      'lat' => '0',
      'zoom' => '1'),
        $atts ) );

    return
'  <div id="mapdiv'.$uniq.'" style="width:'.$width.'px; height:'.$height.'px;"></div>
  <script type="text/javascript" src="'.plugins_url().'/embed-osm/openlayers/OpenLayers.js"></script>
  <script type="text/javascript">
    var map = new OpenLayers.Map("mapdiv'.$uniq.'");
    map.addLayer(new OpenLayers.Layer.OSM());
    var lonLat = new OpenLayers.LonLat('.$lon.' , '.$lat.').transform(
      new OpenLayers.Projection("EPSG:4326"),
      map.getProjectionObject() );
    map.setCenter(lonLat, '.$zoom.');
    var markers = new OpenLayers.Layer.Markers("Markers");
    map.addLayer(markers);
    var marker = new OpenLayers.Marker(lonLat)
    markers.addMarker(marker);
  </script>
  <small>
    <a href="http://www.openstreetmap.org/?mlat='.$lat.'&mlon='.$lon.'#map='.$zoom.'/'.$lat.'/'.$lon.'" target="_blank">大きな地図を表示</a>
  </small>';
  }

  function embed_osm_menu() {
    add_options_page('Embed OSM Options', 'Embed OSM', 'manage_options',
      'embed_osm', array(&$this, 'embed_osm_options'));
  }

  function embed_osm_options() {
    if ( !current_user_can( 'manage_options' ) )  {
      wp_die( __( 'insufficient permissions.' ) );
    }

    if (isset($_POST['update_option'])) {
      check_admin_referer('embed_osm_options');
      $width = $_POST['embed_osm_width'];
      if(is_numeric($width)){
        update_option('embed_osm_width', $width);
      }
      $height = $_POST['embed_osm_height'];
      if(is_numeric($height)){
        update_option('embed_osm_height', $height);
      }
    }
    $width = get_option('embed_osm_width');
    $height = get_option('embed_osm_height');
    echo '<div><h2>Embed OSM Options</h2>';
    echo '<form name="form" method="post" action="">';
    wp_nonce_field('embed_osm_options');
    echo '<table class="form-table"><tbody>';
    echo '<tr><td>Map Width</td>';
    echo '<td><input type="text" name="embed_osm_width" value="'.$width.'" size="20"></td></tr>';
    echo '<tr><td>Map Height</td>';
    echo '<td><input type="text" name="embed_osm_height" value="'.$height.'" size="20"></td></tr>';
    echo '</tbody></table>';
    echo '<input type="submit" name="update_option" class="button button-primary" value="'.esc_attr__('Save Changes').'" />';
    echo '</form>';
    echo '</div>';
  }
}
?>
それでは、設定画面に関する変更点について解説します。
まず、EmbedOSMクラスのコンストラクタでは、
add_action('admin_menu', array(&$this, 'embed_osm_menu'));
WordPressのadd_action()関数を使用して、admin_menuアクションのフックメソッドとしてembed_osm_menu()を登録しています。
embed_osm_menu()メソッドでは、
function embed_osm_menu() {
  add_options_page('Embed OSM Options', 'Embed OSM', 'manage_options',
    'embed_osm', array(&$this, 'embed_osm_options'));
}
WordPressのadd_options_page()関数を使用して、「Embed OSM」メニュー項目に対応する設定画面を表示するembed_osm_options()メソッドを登録しています。
コンストラクタで直接add_options_page()するのではなく、admin_menuアクションのフックメソッドでadd_options_page()するというのがポイントです。
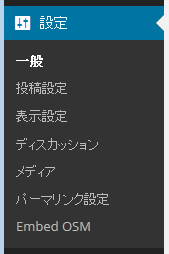
以上で、WordPressのメニューに「Embed OSM」が追加されます。
embed_osm_options()メソッドは、設定画面を表示し、設定値の更新を行います。
function embed_osm_options() {
  if ( !current_user_can( 'manage_options' ) )  {
    wp_die( __( 'insufficient permissions.' ) );
  }

  if (isset($_POST['update_option'])) {
    check_admin_referer('embed_osm_options');
    $width = $_POST['embed_osm_width'];
    if(is_numeric($width)){
      update_option('embed_osm_width', $width);
    }
    $height = $_POST['embed_osm_height'];
    if(is_numeric($height)){
      update_option('embed_osm_height', $height);
    }
  }
  $width = get_option('embed_osm_width');
  $height = get_option('embed_osm_height');
  echo '<div><h2>Embed OSM Options</h2>';
  echo '<form name="form" method="post" action="">';
  wp_nonce_field('embed_osm_options');
  echo '<table class="form-table"><tbody>';
  echo '<tr><td>Map Width</td>';
  echo '<td><input type="text" name="embed_osm_width" value="'.$width.'" size="20"></td></tr>';
  echo '<tr><td>Map Height</td>';
  echo '<td><input type="text" name="embed_osm_height" value="'.$height.'" size="20"></td></tr>';
  echo '</tbody></table>';
  echo '<input type="submit" name="update_option" class="button button-primary" value="'.esc_attr__('Save Changes').'" />';
  echo '</form>';
  echo '</div>';
}
先頭の
  if ( !current_user_can( 'manage_options' ) )  {
    wp_die( __( 'insufficient permissions.' ) );
  }
では、ユーザの権限をチェックし、権限がない場合には、wp_die()関数でエラーを表示して終了します。
次に、
if (isset($_POST['update_option'])) {
  check_admin_referer('embed_osm_options');
  $width = $_POST['embed_osm_width'];
  if(is_numeric($width)){
    update_option('embed_osm_width', $width);
  }
  $height = $_POST['embed_osm_height'];
  if(is_numeric($height)){
    update_option('embed_osm_height', $height);
  }
}
このページにPOSTされて来たのかどうかをisset($_POST[‘update_option’])で確認します。POSTされて来た場合には、入力された値が数値かどうかをis_numeric()関数でチェックし、数値ならばWordPressのupdate_option()関数で設定値を更新します。
check_admin_referer()関数は、この後で出てくるwp_nonce_field()関数と対で使用して、リクエストが他のサイトから来たものではないことを確認するためのものです。
embed_osm_options()メソッドの残りのコードは、設定画面を表示します。
  $width = get_option('embed_osm_width');
  $height = get_option('embed_osm_height');
  echo '<div><h2>Embed OSM Options</h2>';
  echo '<form name="form" method="post" action="">';
  wp_nonce_field('embed_osm_options');
  echo '<table class="form-table"><tbody>';
  echo '<tr><td>Map Width</td>';
  echo '<td><input type="text" name="embed_osm_width" value="'.$width.'" size="20"></td></tr>';
  echo '<tr><td>Map Height</td>';
  echo '<td><input type="text" name="embed_osm_height" value="'.$height.'" size="20"></td></tr>';
  echo '</tbody></table>';
  echo '<input type="submit" name="update_option" class="button button-primary" value="'.esc_attr__('Save Changes').'" />';
  echo '</form>';
  echo '</div>';
<form>の中でwp_nonce_field()関数を使用することにより、check_admin_referer()関数でチェックするための情報が<input type=”hidden” …>で埋め込まれます。
他の設定画面と表示を揃えるために、<table class=”form-table”>を使用します。
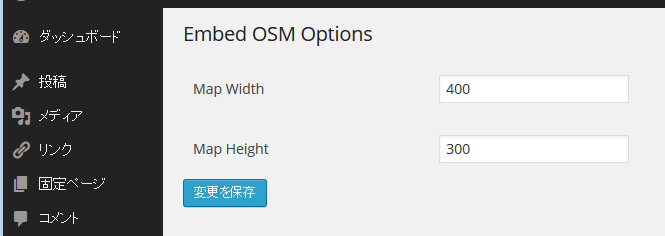
esc_attr__()関数は、ローカライズされた文字列を取得します。ここでは、「Save Changes」に対する文字列として「変更を保存」が得られます。
WordPressの「設定」メニューから「Embed OSM」を選択すると、以下のような設定画面が表示されます。
今回作成したプラグインのダウンロードはこちらからどうぞ。
追記
プラグインの開発者には、その開発環境においてデバッグモードを使用することが強く推奨されています。
デバッグモードを使用するときは、wp-config.phpで
define('WP_DEBUG', false);
となっている箇所を
define('WP_DEBUG', true);
に変更します。