この記事は1年以上前に書かれました。
内容が古くなっている可能性がありますのでご注意下さい。
内容が古くなっている可能性がありますのでご注意下さい。
WordPressの投稿や固定ページにOpenStreetMapの地図を貼り付けるためのプラグイン、Embed OSMのバージョン0.2では、プラグインに関する設定値をWordPressのテーブルに保存できるようにします。
バージョン0.1では、地図を埋め込む領域は
<div id="mapdiv" style="width:400px; height:300px;"></div>
のように、固定値が出力されていました。
この領域の幅と高さを、設定値として保存できるようにします。
ただし、今回は、設定値を変更するUIまでは作成しません(ので、値は固定のままです)。
バージョン0.2のembed-osm.phpの完全なリストは以下のとおりです。
<?php
/*
  Plugin Name: Embed OSM
  Plugin URI: http://midoriit.com/works/embed-osm.html
  Description: Embed OpenStreetMap on the page.
  Version: 0.2
  Author: Midori IT Office
  Author URI: http://midoriit.com/
  License: GPL3
*/

function embed_osm_activate() {
  add_option('embed_osm_width', '400');
  add_option('embed_osm_height', '300');
}

function embed_osm_uninstall() {
  delete_option('embed_osm_width');
  delete_option('embed_osm_height');
}

function embed_osm_handler( $atts ) {
  $width = get_option('embed_osm_width');
  $height = get_option('embed_osm_height');

  extract( shortcode_atts( array(
    'lon' => '0',
    'lat' => '0',
    'zoom' => '1'),
      $atts ) );

    return
'  <div id="mapdiv" style="width:'.$width.'px; height:'.$height.'px;"></div>
  <script type="text/javascript" src="'.plugins_url().'/embed-osm/openlayers/OpenLayers.js"></script>
  <script type="text/javascript">
    var map = new OpenLayers.Map("mapdiv");
    map.addLayer(new OpenLayers.Layer.OSM());
    var lonLat = new OpenLayers.LonLat('.$lon.' , '.$lat.').transform(
      new OpenLayers.Projection("EPSG:4326"),
      map.getProjectionObject() );
    map.setCenter(lonLat, '.$zoom.');
    var markers = new OpenLayers.Layer.Markers("Markers");
    map.addLayer(markers);
    var marker = new OpenLayers.Marker(lonLat)
    markers.addMarker(marker);
  </script>
  <small>
    <a href="http://www.openstreetmap.org/?mlat='.$lat.'&mlon='.$lon.'#map='.$zoom.'/'.$lat.'/'.$lon.'" target="_blank">大きな地図を表示</a>
  </small>';
}

register_activation_hook( __FILE__, 'embed_osm_activate');
register_uninstall_hook( __FILE__, 'embed_osm_uninstall');
add_shortcode('embed_osm', 'embed_osm_handler');
?>
最初の関数
function embed_osm_activate() {
  add_option('embed_osm_width', '400');
  add_option('embed_osm_height', '300');
}
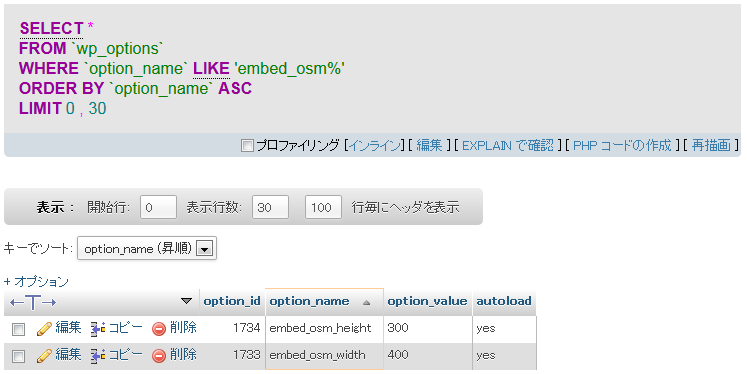
では、WordPresのadd_option()関数を用いて、embed_osm_widthとembed_osm_heightというキーに対する値として、それぞれ400と300をセットしています。これによってwp_optionsテーブルに設定値を保存することができます。
phpMyAdminで確認してみましょう。
次の関数
function embed_osm_uninstall() {
  delete_option('embed_osm_width');
  delete_option('embed_osm_height');
}
は、WordPresのdelete_option()関数を用いて保存した設定値を削除しています。これは、プラグインを削除した際に、不要なデータを残さないためのものです。
ショートコード[embed_osm]の処理をするハンドラでは、WordPresのget_option()関数を用いて地図を貼り付ける領域の幅と高さを取得し、
function embed_osm_handler( $atts ) {
  $width = get_option('embed_osm_width');
  $height = get_option('embed_osm_height');
この値を用いて領域を定義します。
<div id="mapdiv" style="width:'.$width.'px; height:'.$height.'px;"></div>
最後にフック関数を登録します。
register_activation_hook( __FILE__, 'embed_osm_activate');
register_uninstall_hook( __FILE__, 'embed_osm_uninstall');
これによって、プラグインを有効化したときにembed_osm_activate()関数が、プラグインを削除したときにembed_osm_uninstall()関数が呼び出されるようになります。
実行結果はバージョン0.1と変わりません。
[embed_osm lat="35.32395" lon="139.55598" zoom="16"]
と記述すると、以下のように表示されます。
今回作成したプラグインのダウンロードはこちらからどうぞ。